An introduction to fine dining

I’ve always been interested in fine dining ever since I was a kid and I saw chefs making 12-course meals for customers on TV. I always wondered how someone could possibly eat 12-courses. There are of course other options for fine dining but I’ve always been the most intrigued by these absolutely massive meals so let us start investigating what they’re all about.

The meal starts with what’s called an hors-d’oeuvre. Now, this may sound intimidating but an hors-d’oeuvre is simply a fancy way of saying a small savory appetizer like a few small dumplings.

Example of an appropriately sized hors-d’oeuvre

Next up is an amuse-bouche which is a one-bite appetizer chosen by the chef as there are usually options for each course. These essentially serve as a dish to enjoy while waiting for the rest of the food and are a polite placeholder that indicates that there is more to come.

Amuse-Bouche’s are often made of some kind of mousse with toppings.

Next up to the plate for course 3 is a soup. These soups tend to be light and seasonal to be festive and to prevent guests from filling up too quickly as there is much more to come.

A thing soup like this is often used

Course 4 is when some familiar courses start to show up as this is the appetizer course. These assorted small dishes are often served with meat starch and seasonal veggies. This dish is often used to show creativity and variety in the meal.

A light springtime appetizer

The next course is quite interesting but it makes sense as it is going back to keeping it light just in case the course 4 appetizer was too heavy as it is Salad. Which is made with seasonal greens topped in a light sauce often a vinagrette.

The next part of the meal is probably not one that people think of as its own course. Because it is generally served as an entree but course 6 is fish. It is a way to introduce a light protein to cover all the bases before introducing the main course. It is more often a white meat fish like tilapia but it can also be heavier fish like salmon it all depends on the chef.

Next up is the heavily anticipated main course or course 7, which generally consists of a white/light meat like chicken, duck, or turkey. This once again is almost a tease before the second main course. Yes believe it or not there is a second main course coming up.

Garlic Roasted Duck Breast Recipe | Allrecipes

Before we get to that however we have a palate cleanser for course 8, In between the first and second main courses. This is so that guests can fully enjoy both. It is generally something light but with a strong flavor like lemon or mint to remove any residual flavor before the second main course. A common palate cleanser is a lightly sweetened sorbet.

Course 9 is the more elegant second main course that generally consists of red meat of high quality like Lamb, Venison, or a Wagyu FIlet Mignon. These dishes are often the most complex and the most filling which is why the following courses are lighter.

A common second main course (also Gordon Ramsays signature dish) beef wellington.

Course 10 is similar to a palate cleanser but it can have a extrememly pungent smell and flavor. You might’ve guessed it but it is the cheese course. There is generally a variety of cheeses that vary from soft to hard and smelly to a mild smell. These cheeses are also served with an assortment of crackers or bread and sometimes some sweet fruits or jam.

The next course is a lot of peoples favorite and of course it is dessert. This is often a decadant sweet served with dessert wine or coffe/tea.

This image has an empty alt attribute; its file name is image-14.jpeg

Finally we are at course 12. This course is very similar to the amuse-bouche and it is a small bite sized dessert often served with an aged brandy/scotch or tea/coffe.

We finally reached the end of a very long meal. These meals generally cost anywhere from 150-300$ per person. Which is a heafty tag but it makes sense considering just how much is served.

I hope everyone enjoyed I’ll be back tomorrow with another post!

How to study for tests efficiently

Over the years and especially in high school I’ve had to study for hundreds of tests and my very first AP. And through all that I’ve picked up a few tips and tricks that have helped me get through them all with high scores and less stress.

The first one may seem obvious but take good notes, but what do I mean by “good” notes. What makes good notes? From what I’ve found notes need a couple of main things. To start they need to be concise you don’t need to include every and the or but that you see just write down the important things like “mitochondria powerhouse of cell” instead of “The mitochondria is the powerhouse of the cell” even though its only a few words it will add up over a whole lecture.

Image result for notes on a piece of paper

Now that you have got good notes what do you do with them? They may now be concise however it is not practical to read all of your notes to study. Instead what I recommend doing is taking big vocabulary and making flashcards to study them. Next for big concepts, I recommend writing down the concept and trying to remember a brief description of what it is about. And if you have a quiz before your test make sure to write down the questions you missed to study with.

Sometimes teachers aren’t able to go over all the material in a unit or they may add some challenging problems to a test. Instead of stressing about being unprepared you could look through your textbooks and find a similar question or information pertaining to it that will help you study. If that doesn’t work you can often find PDFs of textbooks that way you are prepared for any possible curveballs that could be on the test.

It is also a good idea to quickly review or quiz yourself before a test and if it is on paper then write down what you saw in your brief glance. As often you are studying hours or days before a test and may not remember everything. For example, if you are about to have a math test I’ve found it can be beneficial to quickly look over notes to remember any formulas and then write them down on the test so that you don’t forget them.

June 4 2014 – Review for Test | Mr. Bloch WWMS Room 312

My final tip is one that is quite common but extremely effective. This tip applies when you are actually taking a test, which is to go past any questions that are taking you too long. Then continue through the test and come back to the question. In my experience, this helps me understand the question better and I often catch things I would miss. The main reason this is helpful is that oftentimes tests are timed and you are limited and wasting x amount of minutes on a question is not an option.

Thank you all for reading I hope you enjoyed and stick around for the next post!

How to: AP Tests

I just took my first AP test today in school for AP computer science principles. There were quite a few things I did right, however, there were almost as many things that I did wrong and that’s the reason I’m writing about this today.

Advanced Placement / AP

Though I may have little experience in terms of APs I have learned quite a bit about them even from just one. Let’s start with things that I did well, firstly it is important to pace yourself during the 2-3 hour exam. I personally think that you should finish the test with about 20-30 minutes left to allow yourself to check and revise your answers. I personally finished with 26 minutes left after answering all 70 questions, this leads me to my next point which is DONT LEAVE ANYTHING blank. Even if there is a 1% chance that its right points are not deducted for incorrect answers. So you might as well take an educated guess and fill out an answer.

Do THIS, Not THAT When Writing Multiple-Choice Questions - eLearning  Industry

Nextly it is always a good idea to write down things so that you don’t forget little notes. Because as far as I’m aware there aren’t any rules against that. For example in my test, I wrote down the first 8 bits of binary as I figured it would be useful to know. Another thing that is important to do is to read each question a few times if possible to fully understand what it is asking. As sometimes the wording can be confusing and complex.

Daily MindMeld #76 – Scrambled Words - KewlActiveMinds

Now there is of course something that I would recommend that will help you . The first thing though it seems obvious as well is to study for the weekend coming up to the test if not earlier. This test is an essential part of an AP class and as such it is imperative that you do well on it. This being the case studying for this test should take quite a while but it is necessary as there can be a lot of material that you need to cover.

This next tip has to do with right before the test as in the night before. Getting at least 10 hours of sleep is what is recommended before a huge test like this as well as a filling and nutritious breakfast and lunch. Also if you have other classes before the test it is best to take them easy and not stress as the test will be mentally draining.

Quick healthy breakfast | Recipe | Kitchen Stories

This final tip is for those of you who may have more than 1 AP test in a day. First off good luck and secondly. After you complete your first test I recommend taking a 30 minute break to decompress before studying for your second test. This way you will be refreshed and ready to go once again

Symptoms and Signs of a Nervous (Mental) Breakdown

Thank you all for reading this post I hope you enjoyed it. And make sure to stick around for another post coming soon!

How to create thorough and complete Research.

The first step of this process may seem obvious but first, pick a topic that interests you, for example, I’ve always been fascinated by engineering as well as math so I reached out to some people that understand these subjects better than me to get some guidance on where to start. For example, some people I reached out to are my Highschool AP Physics teacher and my brother who is an aeronautical engineer. I figured these would be the perfect people as they would obviously know lots about these subjects considering it is literally their job.

Another helpful tip before you start is that you should collect your ideas. The way I like to do it is 3 main points each with 2 or 3 sub-points. In the case of a research paper, I would structure it like this: The hypothesis with 2 -3 explanatory subpoints as to why you chose it and why it is relevant. The actual experiment and what happened and what u found and finally the conclusion and closing statements.

Structure | The New Yorker

Now that we have a structure for this research paper we can start actually getting to the experiment it will be different for everyone but an example of a good experiment would be comparing the tensile strength of different types of metal wire. This would just require a hook and weights and it would have a definitive result.

This is just one of the many things that can be made into a research paper but stay tuned for more in the next few weeks.

What opportunities have I gotten from robotics?

I’m sure people are wondering what the benefits have been from doing robotics all these years so I figured I would share some.

The first benefit I have received may seem trivial but robotics has improved my teamwork skills because not only in school but in life you are going to encounter all sorts of people that you have to work with. If you don’t have good teamwork skills it could lead to arguments/disagreements in your work place or at school.

I have also gotten the privilege to go to over 20 tournaments all around California and got to meet lots of other people from other schools and other walks of life. This was mostly in high school and middle school but I did attend some tournaments in elementary school.

I have also recently gotten an internship to help mentor kids in robotics during school and during the summer as well. I do get paid however I am mostly doing it for the experience of mentoring a large group.

I also help mentor at my middle school so that the kids who may be new to VEX robotics can get some help and further their understanding.

I have also gotten quite a few team awards from robotics as it isn’t individual they aren’t “my” medals but rather my teams shared awards

I have also have learned coding from simple blocks to java and JavaScript. Which is definitely a good skill to have for lots of different reasons. This experience was especially helpful for things like my AP computer science principles class.

Those are all the main benefits I have gotten from robotics thus far. I hope you guys enjoyed this post see you next time!

My Robotics Experience(s)

It’s been a little while since I have posted a blog post but I figured it was a good time to mention that I also have experience in robotics and I thought that it would be an interesting topic to add to my blog.

The main reason this is connected to this blog is that recently I’ve been coding mostly on my robot in high school which is pretty interesting. It also requires some technical knowledge as you need to understand the parts of the robot that you are coding otherwise you will likely not code correctly. Which requires more technical or “mechanical” knowledge. Because the team is split into 2 main sub-teams which are the mechanical team that focuses on building the physical robot and the coding team that codes the robot.

This was quite an experience as I had to learn a new but familiar language, Java. Now don’t be fooled by the similarity in the names of Javascript and Java as they are 2 different languages. However, Javascript is what I have been learning in my AP Computer Science Principles class. It has a similar syntax to Java however Java is considerably more complicated. This complication also leads to an increase in complexity. But this also means that the code is more useful.

Now you are probably wondering what brought me to this team and how I decided I wanted to start with coding which is arguably the harder out of the 2 teams. Well it really all snowballed from when I joined the lego robotics team at my elementary school in 3rd grade. I did well in my tryouts and became the captain of one of the 3 teams by 4th grade. After this, we did well in our regional competition. The next year we qualified for state championships where we won a judges award.

This frankly boosted my confidence and I decided that I 100% wanted to try out for the middle school team and sure enough, I made the team. In 6th grade, we won a project award in regionals and another judge award in states. In 7th grade, we finally began with metal robots in the form of VEX robots. These robots are pretty complicated and quite a lot larger than the ones I had used up until that point. I was captain of my team once again and we worked on our robot. We had some disagreements but figured them out by the time regionals came around. Unfortunately, we never made it to states because of COVID.

This was devastating for me as this was going to be my first taste of a real robotics competition but I sadly never got it. During almost 2 years in lockdown, I didn’t do any robotics and I was also suddenly in 9th grade. Our robotics program was still delayed at the high school because of COVID and lax leadership. Eventually, we got on our feet in late December of 2021 when most teams had already started months before. But we did our best to prepare for the competition. Which was last weekend. It went pretty well we placed top 12 out of 50 in the finals tournament and 16th overall. We will be going to LA for our next competition but we still have a long way to go.

There are about 50 members on the team from grades 9-12. The unique thing about our team, Beach Cities Robotics, also known as team 294. Because it is a team with students from both Mira Costa High school & Redondo Union Highschool. Who have been rivals for years in everything from sports to school spirit. Somehow we were able to create a great cohesive team that has won 2 world championships and is still going strong years later.

I hope you enjoyed this different blog, I will be uploading more robotics content in the days to come. But have a good rest of your day see you next time!

Valorant Tips and Tricks

Hello everyone and welcome back to a new post sorry I haven’t been writing as much recently it’s just been a new semester at school and I’ve been focusing on that at the moment. But for now, let’s get into this blog post. So I have been playing Valorant since its release. And overall that time I learned some pretty useful tricks that can be implemented into your gameplay at every rank.

Abilities can be bound to secondary buttons.

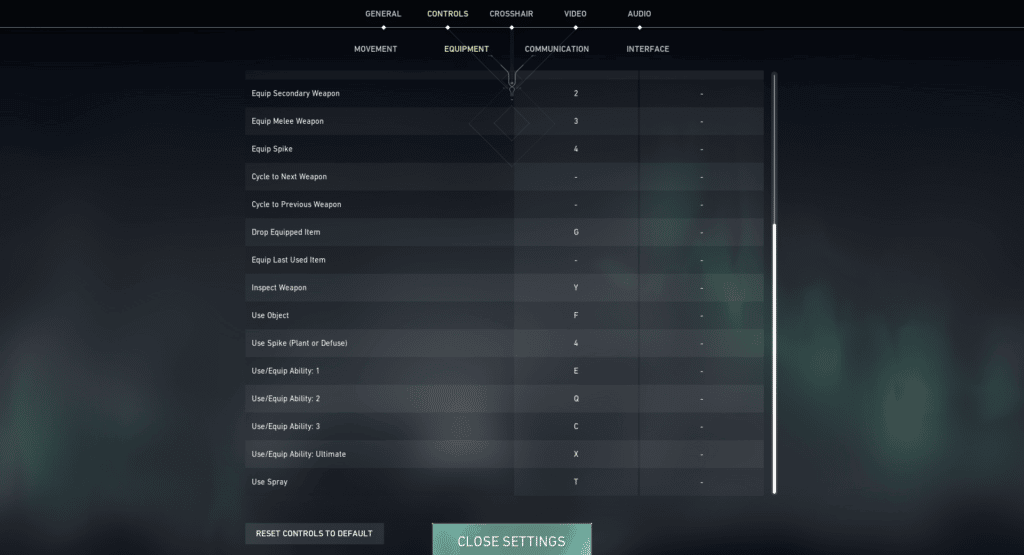
We all know that you can change the keybindings of your abilities but it turns out that you can actually choose a secondary binding for them as well. This may not seem useful at first but in certain situations, it can make all the difference. For example, you can bind Reyna’s to dismiss to the left mouse button. This would make it so that the instant you kill someone you dismiss away. Which could save your life constantly in tough situations.

The Best Valorant Keybinds - WhatIfGaming
The second row is where you can bind a secondary key to an ability
There are headshot indicators on every map

Believe it or not on every map in Valorant there are certain discreet markings that indicate what vertical level to hold your crosshair at. For example on Haven, there are boxes on A, long that have lines between them that line up exactly with a player’s head.

Riot Dev Raises the Curtain on Crosshair Placement in Valorant
Headshot box on Haven

This was in fact confirmed by a developer and these lines were put in the game on purpose.

How to Eco in Val

In Valorant economy is extremely important as it determines what weapons you and your team as well as your enemies have and can afford. If you lose your first round then you should save your credits second round and not buy or buy a sheriff if you are confident you will hit your shots, get kills, and win the round as they are a large investment early game. If you win the first round you can either save or force buy which is recommended so that you can deplete your enemies’ eco even more. The third round is called bonus in which everyone should be able to buy at least a spectre and light shields. After this based on your team’s money you should discuss with them what to do with creds.

Money and Mayhem: a Valorant Economy Guide | EarlyGame

I hope everyone has a good day catch you next time!

Shield Clicker Project Final Part

It’s time for the long awaited final lesson or part of the shield clicker app I hope you guys have had a good time so far but without further ado here is the final part of our project.

To start we are going to add in 3 new variables which are pantheon abilities list and filtered pantheon abilities list as well as ability. These will allow us to pull abilities from for our last function and ability.

Now lets get started with our code. To start we need to setup code to buy our pantheon which allows us access to more abilities.

Now that we are able to purchase our pantheon we need to setup our code for our pantheon ability so that we can actually use it.

This code uses a traversal to traverse our list and select a random option. The syntax of a list starts at 0 hence I set it 0,2 because there are 3 items in the list.

It also has a timer function incorporated in it as I need to set a slight cool down before each ability proc’s.

Next we have our first ability code

This ability sends down a divine bolt of lighting which gives shields which are multiplied by any multipliers that are currently active.

Our second ability is

Is blood lust the more times they click during this ability the more the multiplier increases.

Our final ability is greed which greatly increases our multiplier but de-buffs it to half as soon as the ability is over.

That’s it for our final part of the project I hope you guys enjoyed this post and series have a good day.


How exercise affects your health and all of its benefits.

One thing before we start this post I’m really sorry that I haven’t been able to upload the last part of the shield clicker project. I just really wasn’t able to find time this week but I promise it will be done by next week. But let’s continue to today’s topic.

So the reason I decided to write about this is because I’ve recently started running 2 miles after school every day and also lifting for about 30 minutes. And I’ve been noticed many many benefits. To start I’m able to fall asleep easily whereas before I was struggling and not falling asleep until 11 or even later.

People Running Pictures | Download Free Images on Unsplash

I’ll start with the running as that is something everyone can do and doesn’t require anything other than shoes. It’s okay to start slow when I started I averaged a 14 minute mile because it had been a while since I had really gone running. But in a week I’ve been able to lower that time to about 12 minutes. It just takes repetition and resilience.

It is imperative that you keep consistency in your runs and don’t try really hard one day and do 5 miles and do none for the next 2 days as this doesn’t help build any stamina. My schedule personally is 2 miles Monday, Tuesday, Wednesday, Thursday, Friday, Saturday. And I rest Sunday because that day I have other demanding physical activities to do.

young man resting in a sofa _ Horizontal – Theology & the City

Which brings me to my next point YOU NEED TO REST! Make sure to take at least one day a week to just decompress don’t feel bad this is necessary for your body to adjust and decompress. But now I’ll go over techniques that I’ve noticed have helped me a lot. The first thing is to set a timer and a goal ahead of time which helps keep you motivated. Second drink water before you go 8 oz is the bare minimum because you will become thirsty quickly. Third stretch before and after your run because this will help your muscles relax and heal after building up all that lactic acid while running.

Lactic acid molecule Royalty Free Vector Image

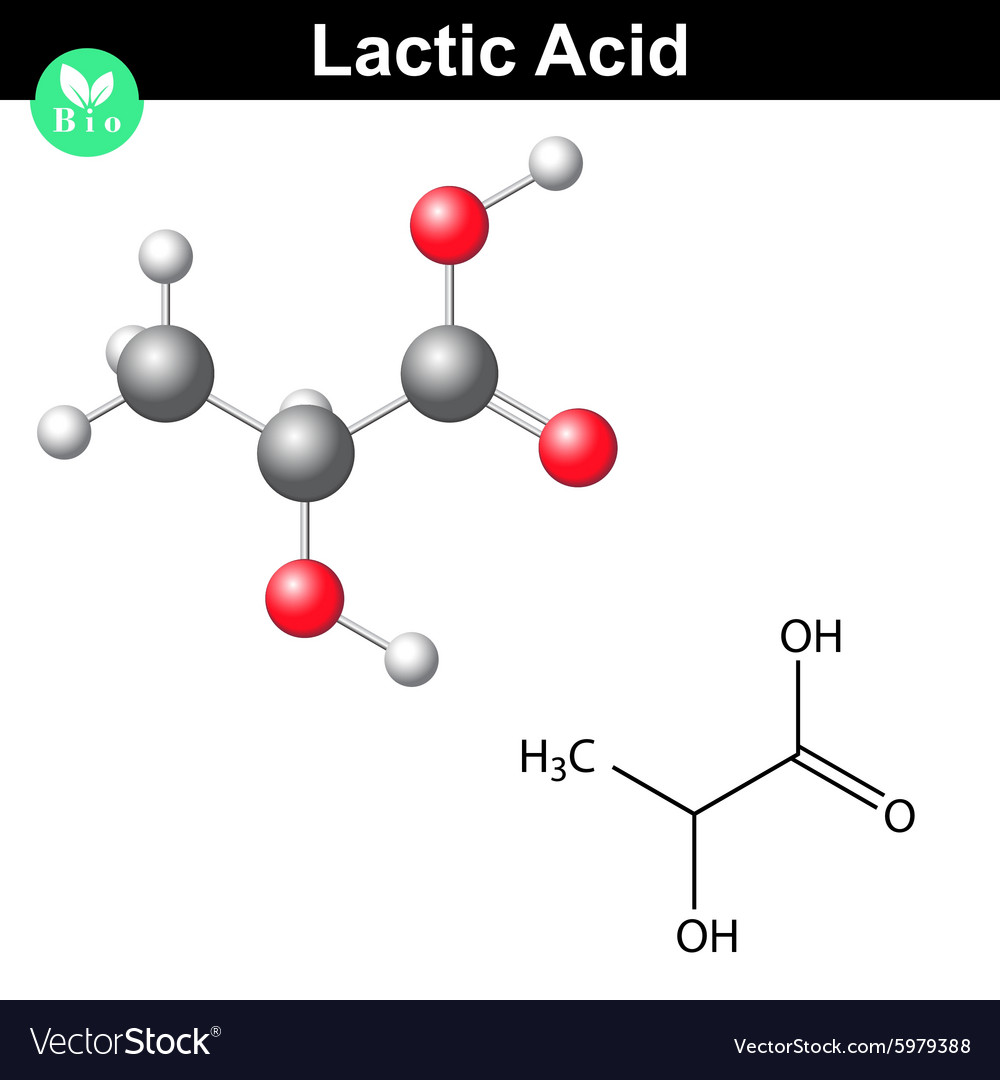
Speaking of let me explain what lactic acid is. Lactic acid is essentially a substitute for the end product of cellular respiration. So a glucose molecule breaks down into pyruvate as usual in cellular respiration but after that the pyruvate breaks down into lactate. This lactate along with approximately 4 ATP molecules into your muscles as opposed to the usual 30-40 from cellular respiration. This lactate begins to build and build until it forms the acid pictured above inside your muscles. This causes that familiar burning feeling that most people feel after running or straining their muscles in some way. Which is why stretching after is important and so is drinking water because it helps move around and break down that acid. Which allows your muscles to heal faster.

But enough science for one day time to get back to the actual blog I’m now going to transition into the lifting section of the blog so if you are not interested in this part thank you for visiting this page and have a good day. For those of you interested here we go.

Weightlifting benefits and side effects for a woman

The type of lifting I do is light weight and high rep or repetition. This is because I am trying to build muscle. People who lift heavy are generally already strong and are trying to go for PR’s or personal records in terms of how heavy they can lift.

To start I’ll go over a typical arm day with me. So I come back from running between 4:30 pm and 4:45 pm and then I shower and get ready by 5 pm. I then lift for about 30 minutes and then finish up my homework. During my lift sessions I start with about 25 reps of biceps curls, 25 reps or hammer curls, 25 reps of chest press, 25 reps of overhead press, 25 reps of tricep extensions, and back presses 25 reps. I do these with 10 pound weights and I do 25 each arm of course not just 25 one arm

I hope these helped out. Thats all for today have a good day and see you guys in my next post!

Valorants new sentinel

Hello and welcome back to another blog post. today’s blog was supposed to be part 9 of our shield clicker project however I am not feeling well. Thankfully it isnt covid but it is a nasty ear infection. I should however be able to have that post up tomorrow so stay tuned.

This new agents name is chamber and he hails from France. He has 4 abilities just like every other agent. So lets dive right into them.

L'Accord - Chamber Agent Trailer // VALORANT - YouTube

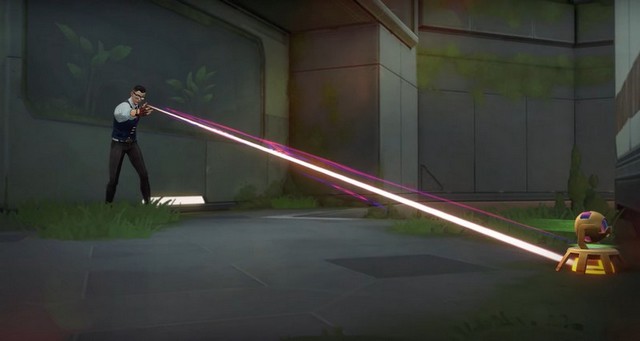
His first ability is called “Trademark” and it is a small robot that scans for enemies and then explodes into a large radius slow it also alerts chamber. Which is a quite useful ability similar to cyphers tripwires.

Valorant's New Agent is Called Chamber; Here Are All the Abilities and  Ultimate | Beebom

His next ability is called “Headhunter” it is a pistol that he can summon when the player presses q. This makes chamber the only agent that can use 3 guns in one round. This pistol is very similar to the sheriff and costs credits for each bullet.

Chamber New Visual Bug With Headhunter!!! (FIXED) - YouTube

Chambers 3rd ability is called “Rendezvous” This allows chamber to put down and pickup 2 teleport points that he can move between when inside a certain radius around them by clicking E.

Valorant Chamber Guide: How to play with the agent on Ascent

Chambers final ability is his ultimate called “Tour de Force”. It allows him to summon a sniper rifle with a limited ammo supply that is similar to the operator. Making him not only the only agent that can use 3 weapons but also the only agent that can use 4 weapons.

VALORANT new agent Chamber: A charming defense monster

I hope you guys enjoyed this blog post sorry it was kind of short I am just really not feeling well I hope everyone has a good rest of the week and stay safe.