Posts

Epic Boss Fighter Step 3: Vrunzol´s attack

To start this blog we will be adding a new sprite to our game or actually 3 of them. These sprites will be orbs that Vrunzol shoots and they will go in random directions so lets start by getting the right sprite.
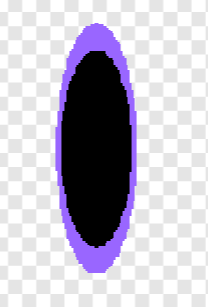
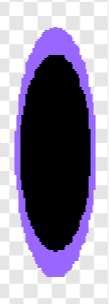
This sprite was very easy to make as I just drew a purple oval and then I put a smaller black oval inside of it. Once we have coded the orb to damage the Mech and mpove properly we will just duplicate it twice.

But now lets get to the code.
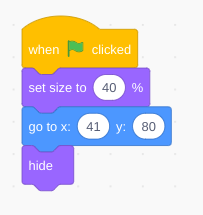
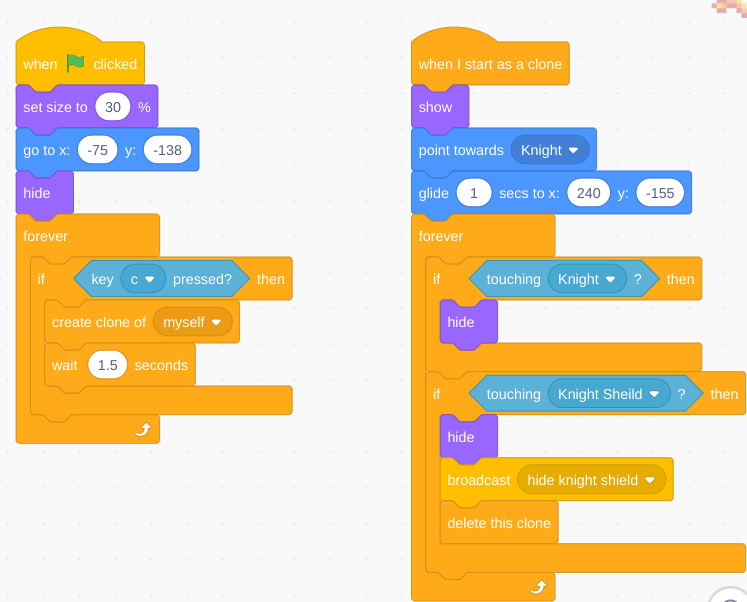
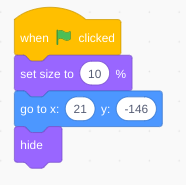
This piece of code is our first and its function is to set the orbs to the correct size and to move them to the correct spot and each orb will have a different position but it really does not matter as the actual sprite will not move at all.
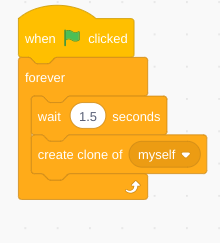
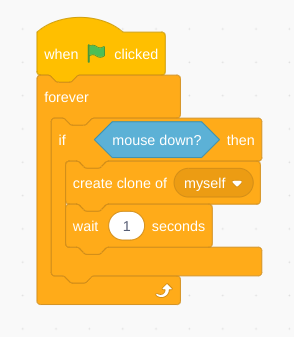
Now with this piece of code the orbs will create clone of themselves every 1.5 seconds and they will not move or show themselves so we have to add code to make them do so.
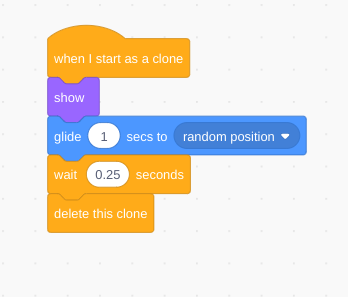
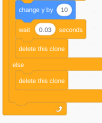
With this piece of code the cloned sprite will move to a random position on the map and then after 1/4 of a second it will delete itself. Now for the final pieces of code for the orbs.
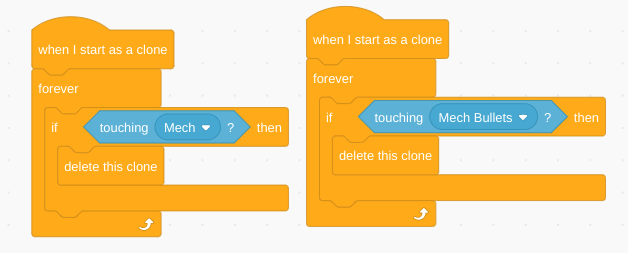
These 2 pieces of code will determine what happens if an orb was to come into contact with either of these sprites. And of course we have to add one final piece of code that will allow the orbs to actually damage the Mech.
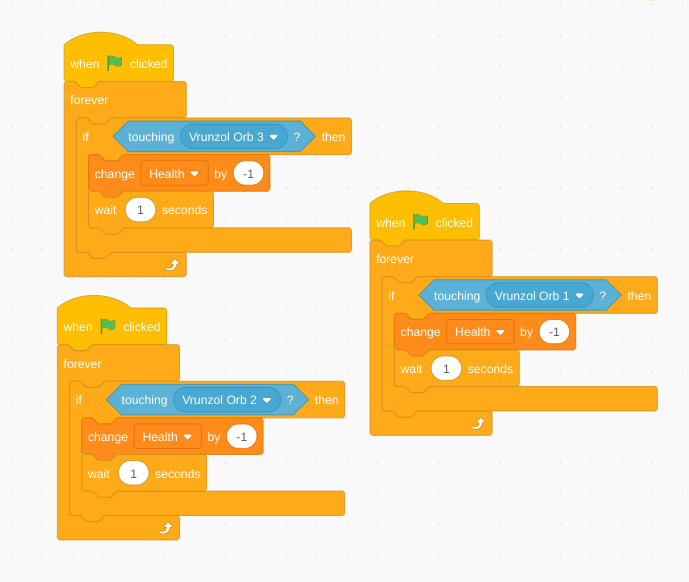
And with this final piece of code the attack function for Vrunzol and his orbs is complete. And since their are 3 orbs we had to duplicate the code 3 times once for each orb.

Thats it for this blog thank you for reading and check out my YT channel if you want @Drago Gaming link:https://www.youtube.com/channel/UCrlNUqQVBxLIbdltHQBdcYg?
Epic Boss Fighter Step 2: Mech attacks and Vrunzol movement

To start this blog post I will be showing you how to create the Mechs attack. This will allow the mech to damage Vrunzol.

The first step will be to create thefiring animation and honestly this step is the most difficult as it will require a couple of complicated pieces of code. So here is thefirst piece we need.

This is the basic piece of code we will need for the mechs bullets and this piece of code will go into the bullet sprite not the Mech. This will make it so that when I press down my mouse pad it will create a clone of itself although this clone will not move as we have not told it to so it will just stay exactly where it was created which was right on top of the sprite.

Now that we have this we need to add our second piece of code which is pretty long but it does allow our sprite to have pretty clean movements.

I am sorry that the code is this long but it is to ensure the smooth movement of our bullet as other wise it would slowly be moving and then abruptly stopping until it reaches its destination.

Now that we have these 2 pieces of code we just need 1 more piece for a fully function bullet and then we also have to add 1 or 2 pieces of code to Vrunzol along with his movement code that will allow the bullets to actually damage him.

This final piece of code is simple and so is it´s purpose as it is used to hide the bullet and make it rest on our Mechs arm where his gun is.

now with this our mechs attack is fully functioning and the last thing we have to do is make the attack damage Vrunzol and get his movement code.

First lets start with his movement code.

This will allow Vrunzol to smoothly move across the screen and last we have the damage code.

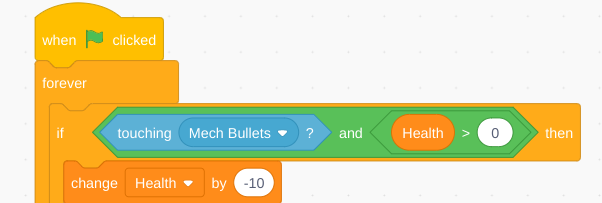
With the help of our special variable block we will be able to give Vrunzol health that the Mech bullets will be able to deplete and once that health bar gets to 0 Vrunzol will be dead and we will of course give hima nd all of the other bosses a death animation.

That is going to be it for this blog and if you want check out my YT channel @Drago Gaming link:https://www.youtube.com/channel/UCrlNUqQVBxLIbdltHQBdcYg?view_as=subscriber

Epic boss fighter Step 1 basic character controls

in this blog we will be starting our second game this game is going to be a boss fighter where our character will be fighting many strong bosses and he will be able to unlock upgrades with the money he gets from killing the bosses.

The first step will be to create a cool character and then giving him basic movements and a weapon that he will use to kill the bosses with.

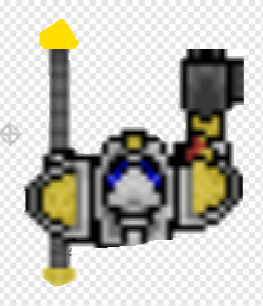
I painstakingly drew this character but at the end I got a little lazy with his spear but this was my final design

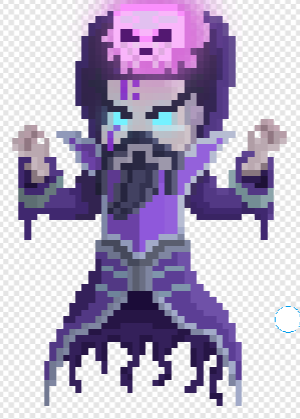
This character is going to be called Mech as it looks to me like a robotic warrior. Next we will have to create our first boss. He is going to be a sorcerer and as such I chose the following design for him.

I named This character Vrunzol as it is the username of one of my friends in Minecraft and he has helped with scratch projects in the past so I named this boss vrunzol.

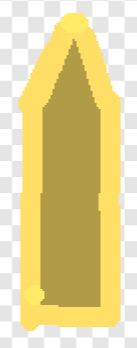
Now that we have 2 of our 5 sprites but we still have a couple more to design. I decided to go with a pretty simple design for my Mechs bullets.

Now it may not look that great but keep in mind the mech si considerably smaller than the bosses and the bullets are much much smaller than the one in this picture so it will not be a problem.

And last but not least we have Vrunzols orbs.

And now that we have our sprites we will start with the mechs basic movements and then tomorrow we will cover vrunzols movements as well as his attacks along with the mechs.

So to move our mech I am going to using a simple command structure that will have a basic design and slight things will be tweaked in each of these designs based on the direction the mech is moving.

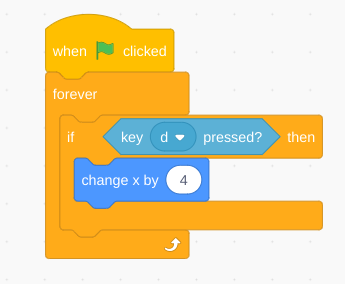
First off we have moving to the right.

So now when we press the d key the mech will move right now lets use this basic design and add all of his other movements

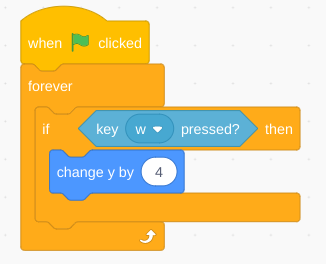
We will be using W to move The mech forward in case you want to move closer to vrunzol.

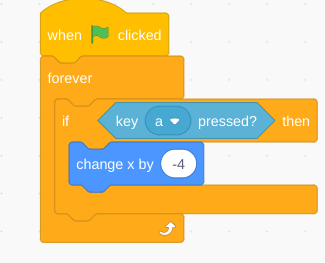
With the A key we will move The mech left.

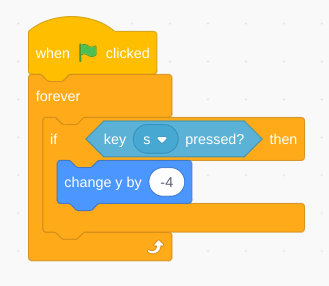
And last but certainly not least the S key will move The mech down away from vrunzol.

Thank ypou all for reading my blog and If you want check out my Yt channel @Drago gaming link: https://www.youtube.com/channel/UCrlNUqQVBxLIbdltHQBdcYg?view_as=subscriber

Making an MCPE server with Aternos Step 2: Building Beginner Mine

Our next step now that we have our basic settings and mods will be to make our mines where people will be able to get resources they can sell for money. Our first mine which I will be calling the beginner mine

This mine will have basic resources like coal, iron, and gold as well as some cobblestone. This mine will be pretty basic and it will be accessible for everyone and free. Although the resources it has will nto be worth that much as they are low tier.

After we finish the outside quartz ring I am making I will begin to clear out the inside. Unfortunately I do not have any pictures of the build as it is on mobile and not my computer

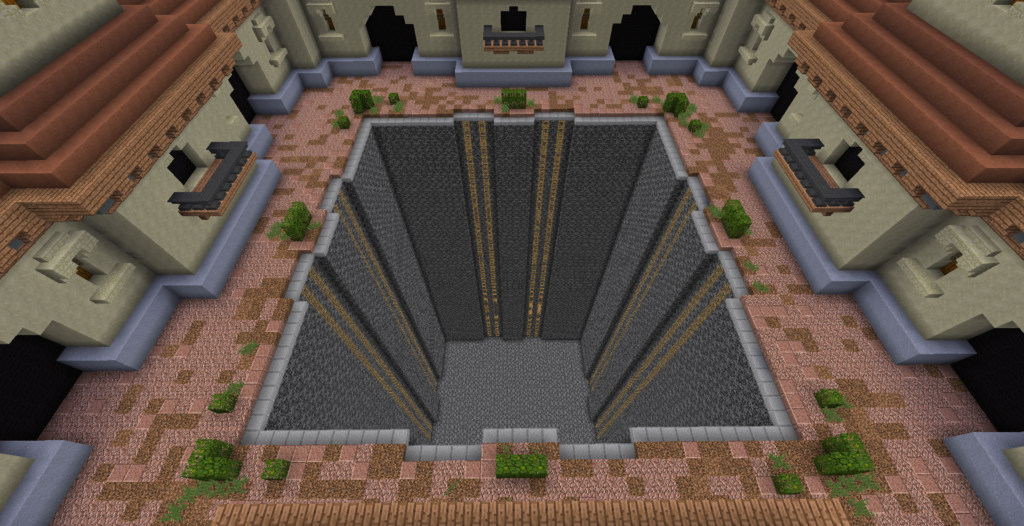
I am building the out side out of quartz and the inside will be full of resources and the very bottom layer will be made out of bedrock. It is also important to incorporate lighting into your mine otherwise it will be difficult for people to see while they are mining. but when I am finished my mine will hopefully look something like this.

Andthen once that is done I will fill it in with layers of resources from the bottom up for example: the bottom layer will be gold/coal blocks and then the layers above that will be iron and gold and coal and they get less valuable the higher up you go but there will be some occasional rare resources near the top but there will be a much higher concentration of them at the bottom of the mine as that is how the resources would have spawned in a real MCPE mineshaft.

After we have filled in the mine we will ahve to set up a slapper ( An NPC shop basically) that will buy our resources that we mine and give us money in exchange.

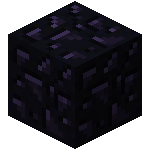
The way things will be priced are as follows: Coal is 10$, Iron is 50$, gold is 75$, Redstone is 85$, Lapiz is 100$, Diamond is 200$, Emerald is 250$, coal blocks are 200$, Iron blocks are 300$, Gold blocks are 400$, Redstone blocks are 450$, Lapiz blocks are 500$, Diamond blocks are 1000$, Emerald blocks are 1250$, and Obsidian is 5000$ because it can only be found in the PVP Mine where and there as the name suggests PVP is enabled and if you die you lose everything you have in your inventory and all of your levels.

Also on my server I will have a spawn pvp area where you can practice your pvp without losing your gear (It will lose durability and it can break so dont just ignore your armor and weapon durability) But then there will also be a warzone and the PVP mine where you will lose your gear and no one is held responsible for your gear except for you so ifyou lose it there it is entirely your fault.

thank you all for reading this blog and I hope you learned some things and enjoyed it check out my YT channel @Drago Gaming link:https://www.youtube.com/channel/UCrlNUqQVBxLIbdltHQBdcYg?
Making an MCPE server with Aternos step 1

This is going to be a blog series about how I am setting up a server Called DragonCrush. This will be a factions server so the main ways to get cash will be to mine and to kill other players.

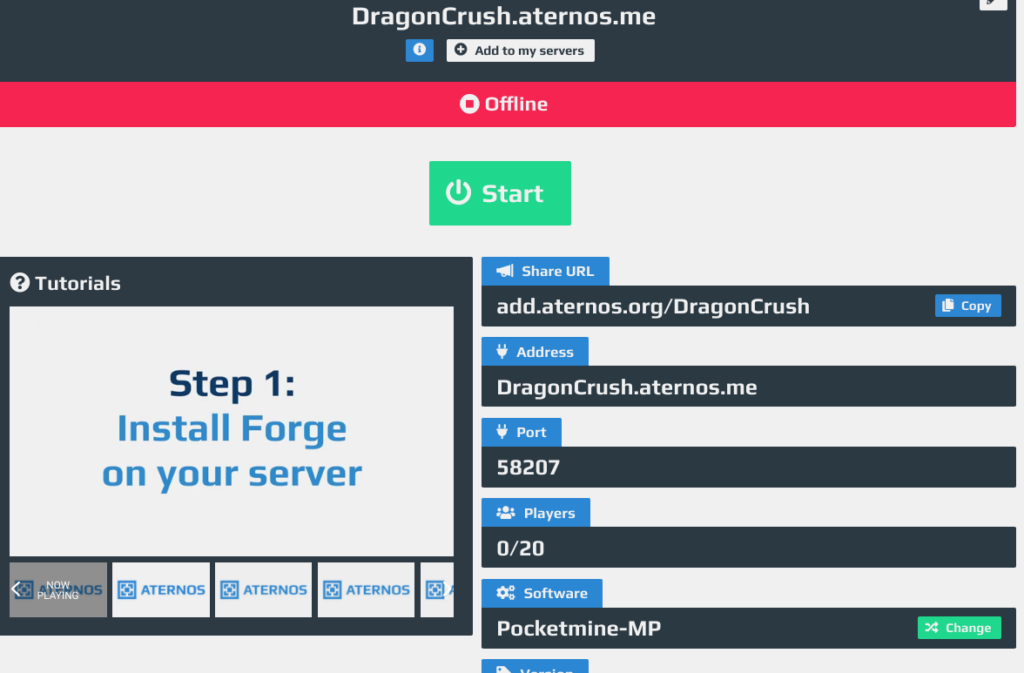
The first step is to go to aternos and create a server and the first page will look like this.

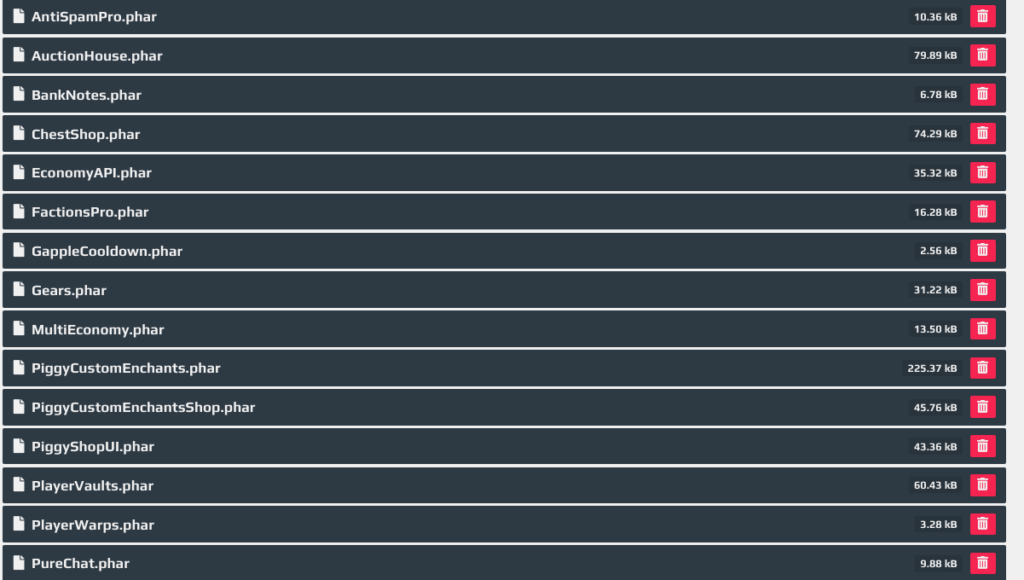
There is also a menu bar with all sorts of mods you can add I added a few and I am setting them up right now along with the mines.

One of my personal favorite mods is the PiggyCE mod that allows you to get custom enchants on your server. The first step to build my factions server however will be to set up mines. These mines will be a great way for new players to make money and to get awesome gear among other things.

There will be 10 mines on the server each will be about 20 by 20 and 9 of these mines will be safe where as 1 of the mines will be a pvp mine where pvp is enabled. And players will be able to go to higher mines once they pay a certain amount of money.

These are exmaples of some mods I have installed. But Now I am going on to my server to create the first mine that will be the noob mine and that will be our next step creating our mines/lobby that players will spawn in.

But before we get to actually building on our server there are a couple more things I have to explain your server can be on 24/7 if there are players on for example my server is off for right now as there are no players on right now. But this will not be a problem later on.

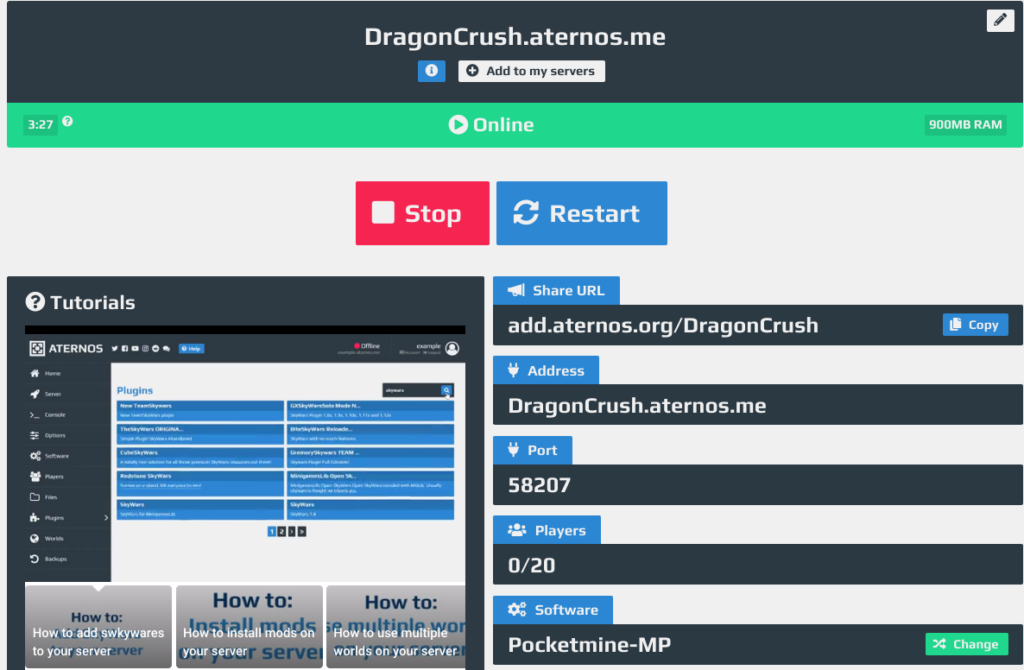
Also if you are installing a mod you want to make sure that it is compatible with your servers software I am using pocketmine 3.12 and it is up to date with all the mods I have installed so far but now let me show you what my server looks like right now.

There is a small timer on the left and if no one joins your server within that 3:30 mins then it will automatically shut off but you only need 1 player online.

Those are the basic rules and settings of aternos and I will customize them all later but for now those are what I have.

Thats going to be it for this blog but I will be doing another one shortly Thank you for reading and checko out my YT channel @Drago Gaming link: https://www.youtube.com/channel/UCrlNUqQVBxLIbdltHQBdcYg?
2 player battle simulator Step 8: Warlock damage and death animations

This step is going to be pretty similar to our previous step as it will be for the death and damage animations for the Warlock instead of the Knight.

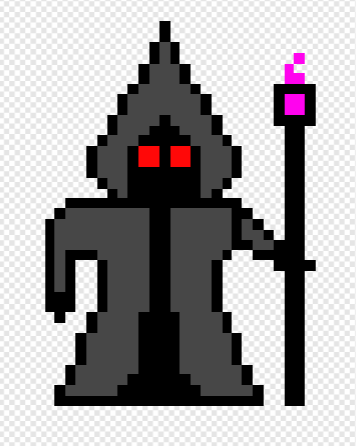
Just as in the previous step we will need to add a bunch of new sprites aside from our basic Warlock.

Normal undamaged warlock

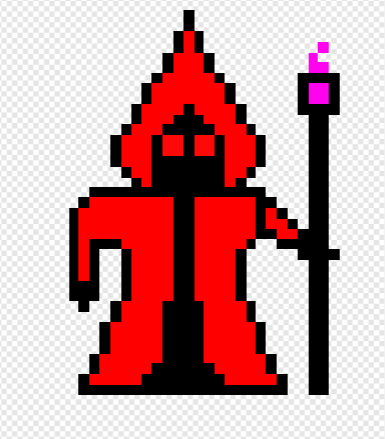
Now we need to add a Warlock skin to show that he is taking damage I decided to design mine like this but you can design your however you want.

Damaged Warlock

This is our damaged warlock who flashes red and then goes back to his normal color. And unlike the Knight the entire warlock flashes red as opposed to just his border. Also our Warlock has one more skin.

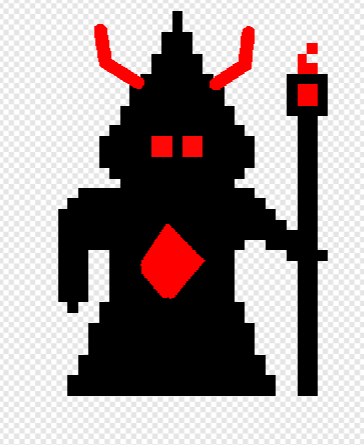
Ultimate Warlock

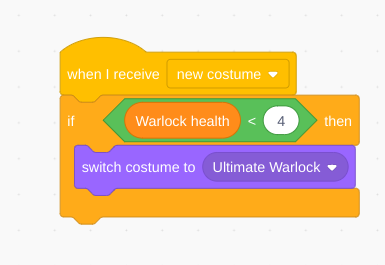
This is our Warlock in his ultimate state and this state activates when his health is less than 4. But we will get to that code a little bit later first we need to design the code that will cause the damage animation.

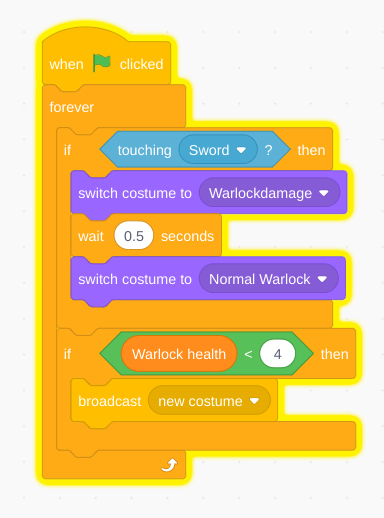
Code for the warlocks damage animation

this is the code for the Warlocks damage animation and it is pretty simple. First it runs forever so whenever the sword is touching the Warlock it will activate this command.

First this command will change the Warlocks skin to warlock damage. then it will broadcast a message to change the warlocks skin to ultimate warlock if the warlocks health is below 4 and if it is not the it will not broadcast the message.

Next we have our ultimate warlock animation code

Ultimate warlock code

This code is fairly straightforward as it double checks the Warlocks health in case the previous code had an issue/glitch and then it changes the warlocks skin to the ultimate warlock.

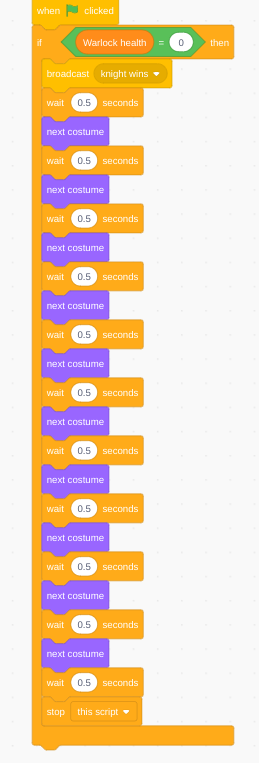
And last but certainly not least we have the Warlocks death animation.

Warlock death animation

This code is kind of long but that is because the warlock is frequently switching between costumes so it looks like an animation as it runs and it will slowly show the Warlock withering away.

I made a total of 13 costumes for the warlock and the death animation uses 11 of them so it ended up being pretty long it also makes the knight brag about defeating the warlock similary to how the Warlock shouts ¨Filthy Dead Muggle HAHAHAHAHA¨ but obviously the knight isnt as mean or rude as the warlock.

Also this is my last blog post for this game but there will be 2 optional steps Iĺl be posting later this week but I am going to be starting a new series of coding and this game will be a boss fighter game so stay tuned for that.

Thanks for reading my blog and if you want subscribe to my YT channel @Drago Gaming link: https://www.youtube.com/channel/UCrlNUqQVBxLIbdltHQBdcYg?
And if you have any questions feel free to email me. @ [email protected]

2 Player Battle Simulator Step 7: Death and Damage animations for the Knight

Asyou can see from the title we are getting pretty close to finishing the game and we only have 1 more required step left, and 2 optional steps. But for now lets get into this step.

When I say animation it is more like a quick costume change in terms of the damage animation but the death animation is a little bit more tricky and it is more like a real animation.

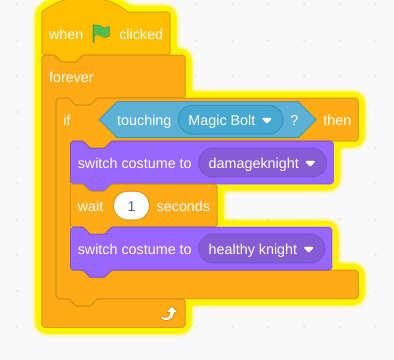
Lets first take a look at the damage animation.

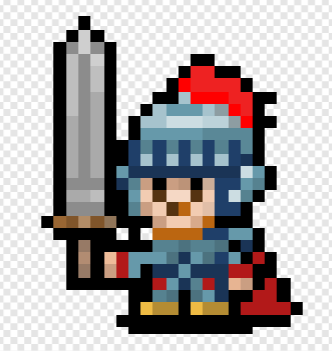
Now with this code we will switch from the normal non damaged knight,

To the damaged Knight

Keep in mind the knight will only breifly flash red and then he will return to his normal state so we added the wait 1 second command and then we have the knight go back to his usual state.

But in the case of the death animation things will be very different.

this is the code for the knights death animation.

Now I am sorry that it is this long but I wanted it to be detailed. But the basic idea is that after the Knights health goes below 1 he starts to crumble to dust.

And the only thing is you have to draw all of the costume which will be slow and quite boring but you should be able to get through it.

Thanks so much for reading this blog and be sure to subscribe to my YT channel @Drago Gaming https://www.youtube.com/channel/UCrlNUqQVBxLIbdltHQBdcYg?
2 Player Battle Simulator Step 6: Powerup

In this blog I will show you how to add a powerup to your game. This powerup will give whichever character touches 1 more health. This could be very helpful if a character loses health he could regenerate it.

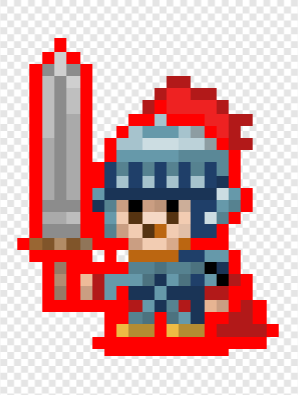
To start as always we will need to get a sprite I chose this yellow-orange star and as always you can choose whatever sprite you want.

Now that we have our sprite we will start to add our code and as a fare warning it is pretty complicated but i’m sure you can handle it.

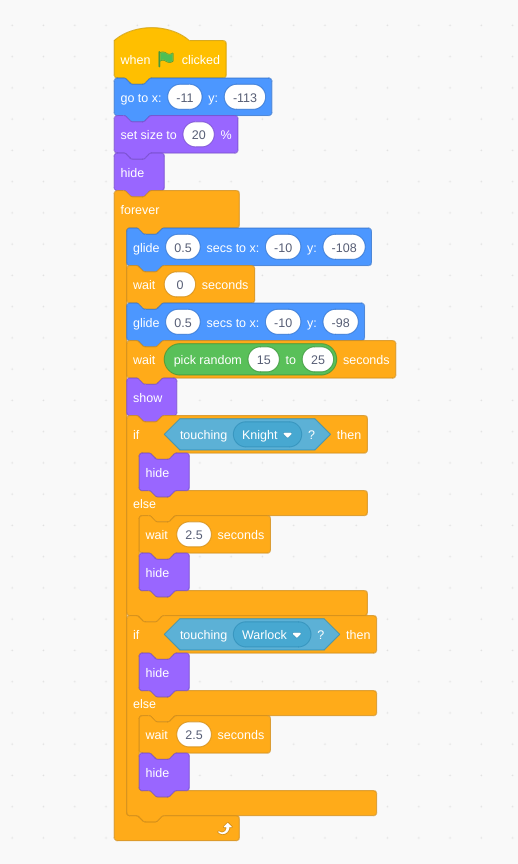
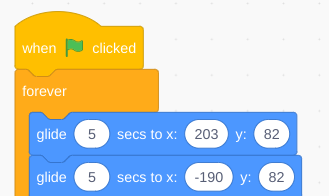
This is the code for the power up

Now this is the code that the powerup will follow. I will briefly explain what it does. First it goes toa specific place on the battlefield and it hides it self. Next is moves around the map slowly and then it shows itself for 2.5 seconds and then hides itself and it can appear anywhere between 15 and 25 seconds.

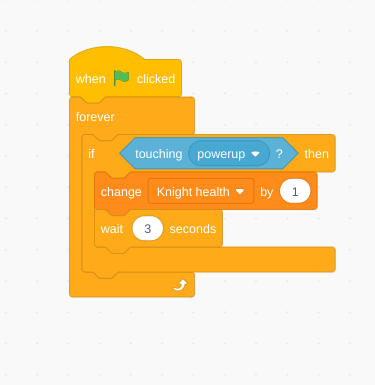
So that’s the basics of how the powerup code but now we need to add the code to the Knight and the Warlock. The two codes are pretty similar but we will start with the Knight.

Now that we have this code added to the Knight when it touches the powerup it will get an additional health and if the Knight touched the power up without this code it would not do anything. Now that we finished the code for the Knight we have to add it for the Warlock.

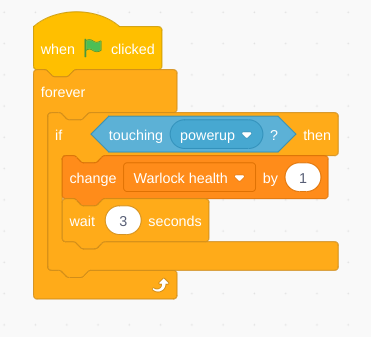
As you can see the codes are virtually the same except for the variable block but other than that they function the same way.

Thats going to be it for this Blog thank you all for reading I hope you enjoyed and learned Subscribe to my YT: @Drago Gaming https://www.youtube.com/channel/UCrlNUqQVBxLIbdltHQBdcYg?
A new promising cure for COVID-19

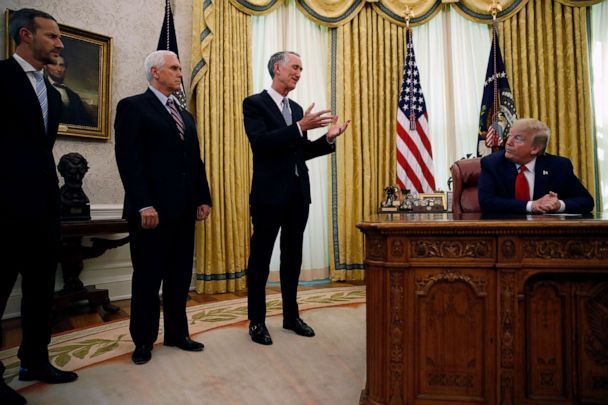
CEO of Gilead Daniel O’day meeting with president Trump

This image above is a picture of the CEO of Gilead meeting with President Trump. This meeting was arranged as Gilead has created a prevention drug known as remdesivir which was just recently approved by the FDA and it is being allowed to be used compassionately ( It is allowed to be used in severe cases) and it will help prevent the loss of life due to the coronavirus.

The FDA has approved remdesivir due to its great success during its clinical trials and while this drug will not cure the virus it will prevent those who have extreme cases of the virus from dying. This is a big step to being able to cure the virus and hopefully eradicate it similarly to how we eradicated such as polio and measles

Gilead has been developing this prevention drug since the beginning of the pandemic and it has finally been approved by the FDA and so to finalize this Daniel O’day had a meeting with President Trump and now remdesivir is being shipped across the country to hospitals who need this drug to help severely ill patients.

2 player battle simulator step 5: defense and defense break for the Warlock

This step is going to be similar to step 4 but it will be slightly different as it is for the Warlock as opposed to the Knight which means we will definetely alter the code.

The first step is obviously going to be coding the magic shield which is the Warlocks defense feature.

This is the sprite I chose for my magic shield

This will be the Warlocks magic shield and he will use this the same way as the knight. obviously its function is to completely repel the knights attacks so that the Warlock does not take any damage and so the Warlock can prepare for a counter attack.

The code for the shield is pretty simple,

Code for the Warlocks Magic Shield

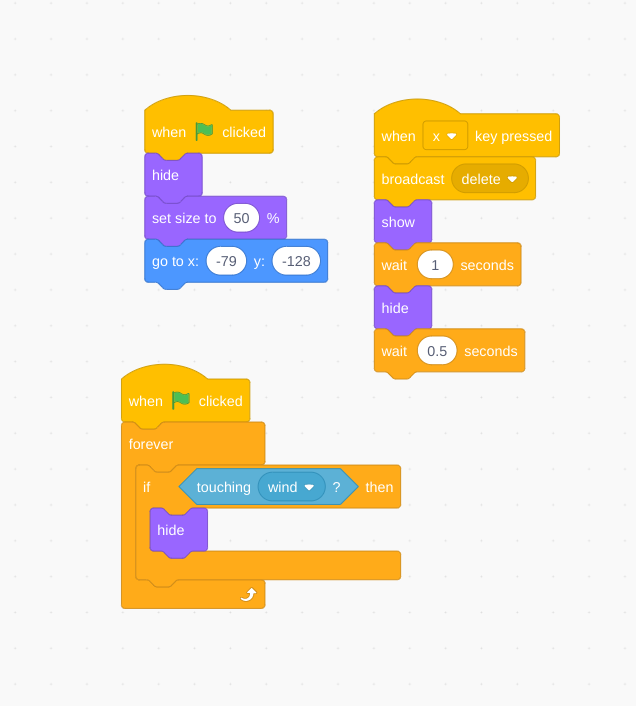
This code will do many things first off it will hide the Magic shield and set it to the correct size as soon as the game is started. Next when the player presses x it will broadcast delete which is just used to ensure the shield does not create 2 of itself, then it will show itself for 1 second and then hide itself once again. And at the very end to ensure that it cannot be spammed I added a 0.5 second cool down. Finally if it touches the knights wind/ defense break it will immediately hide itself allowing the Knight to attack.

Now that we know the functions of the shield we can move on to the defense break. Just like the other defense break the code will be slightly harder than shield code as it serves a more advanced and complicated purpose.

The sprite for my defense break code

I figured it would be interesting to have winds for both defense breaks but I realized that I would have to make the Warlocks fire wind look unique and different from the Knights wind so I made it into fire wind. Next up we have to code this sprite.

Code for the Warlocks “Fire Wind” defense break function

Putting in to consideration that this shield break is almost identical to the Knights shield break I think it is best if we skip over the basic functions and talk about the more important aspects of the game and these functions.

All the main functions of the game are completed so now we have a couple things left before this game becomes fully functional as well as some optional/additional finishing touches.

The main things that we have left to include:

  1. Adding multiple backgrounds
  2. Adding death animations for both characters*
  3. Adding damage animations for both characters*
  4. Adding all necessary variables
  5. Adding some extra sound effects*
  6. Adding a power up*
    1. All things on the list with an * next to them are optional but I personally recommend adding them as they really help complete the game.

That is going to be it for this blog thank you for reading if you have any questions email me @[email protected] And Sub to my YT channel @Drago Gaming link below: youtube.com/channel/UCrlNUqQVBxLIbdltHQBdcYg

Sorry for some reason the link will not become a link so you will have to copy and paste it for it to work. Sorry about this inconvenience hopefully I will be able to fix it in the future.